

When the first forkful of a silky, luscious cheesecake meets your lips, it’s like a luxurious lullaby for your taste buds. In this Vanilla Bean Butter Cheesecake, every element sings together in perfect harmony: a golden, buttery graham cracker crust that cradles a velvety filling dotted with real vanilla bean specks. There’s something so satisfyingly classic about vanilla—its sweet, floral notes elevate that creamy tang of cream cheese, and when paired with the rich, almost caramel-like nuance of melted butter, every bite feels like a warm hug. Whether you’re sharing it with family at a holiday gathering or sneaking a private slice late at night, this dessert promises a little slice of joy for every occasion.
But let me tell you, the real magic happens behind the scenes. It’s the careful slow mixing that prevents lumps, the gentle folding of sour cream and heavy cream to keep the texture cloud-like, and the patient cooling that ensures each slice holds its shape like a dream. You’ll find that scraping those tiny vanilla bean seeds into the batter releases a profound depth of flavor—far more intense than extract alone—and the slight jiggle in the center after baking is your green light to let it rest, relax, and develop its signature creaminess. Trust me, once you’ve mastered this recipe, you’ll be the go-to cheesecake champion among your friends and family, with rave reviews guaranteed every single time.
KEY INGREDIENTS IN VANILLA BEAN BUTTER CHEESECAKE
Before diving into the step-by-step process, let’s explore the star players of this creamy masterpiece. Each ingredient here has its own role in building layers of flavor and texture—from the sturdy foundation of the crust to the rich, velvety filling. Understanding how they contribute will help you appreciate the little details that turn a simple dessert into a showstopper.
- Graham cracker crumbs
These golden crumbs form the buttery base of your cheesecake. When combined with sugar and melted butter, they press into a sturdy crust that balances the silky filling while adding a hint of honeyed crunch.
- Granulated sugar
Sweetness is the soul of any dessert, and this sugar serves double duty—bringing just enough sweetness to the crust while also gently sweetening the cream cheese filling. It helps achieve a smooth, cohesive batter when beaten into the cream cheese.
- Unsalted butter
Melted and mixed with crumbs, this butter binds the crust and lends that irresistible richness. Using unsalted ensures you can control the salt level, keeping the flavors balanced and pure.
- Cream cheese
The heart and soul of the cheesecake. Softened to room temperature, cream cheese gives the filling its signature tangy creaminess. Beating it slowly prevents lumps and creates an ultra-smooth batter.
- Eggs
Eggs act as the natural thickening agents, providing structure and stability. Adding them one at a time ensures each egg is fully incorporated, preventing overmixing and cracking.
- Vanilla bean paste or vanilla seeds
Here lies the magic touch: those tiny black specks you see aren’t just decoration—they’re pockets of intense, floral vanilla flavor, delivering a far richer profile than vanilla extract alone.
- All-purpose flour
A small addition of flour adds strength to the batter, helping it set properly without compromising that characteristic creaminess. It also prevents cracking during the bake.
- Sour cream
When gently folded in, sour cream lightens the texture and adds a subtle tang, balancing the sweetness while making the filling exceptionally smooth.
- Heavy cream
Heavy cream contributes extra silkiness and body to the batter. It enriches the texture, giving each slice that gentle wisp of creaminess that melts on the tongue.
HOW TO MAKE VANILLA BEAN BUTTER CHEESECAKE
Let’s roll up our sleeves and walk through each important phase of this cheesecake journey. From preparing a sturdy, golden crust to mastering the smoothness of the filling, every step matters. Follow along to create a dessert that’s as beautiful as it is delicious.
1. Preheat your oven to 325°F (163°C) and grease a 9-inch springform pan. Ensuring the pan is well-greased prevents the crust and edges from sticking, so your cake will release cleanly after baking.
2. In a mixing bowl, combine the graham cracker crumbs, sugar, and melted butter. Stir until every crumb is moistened and starts to stick together—this ensures an even, firm crust once pressed.
3. Press the crumb mixture firmly into the bottom of the prepared pan. Use the back of a spoon or the bottom of a glass to compact it evenly, creating a level surface that will support the filling without crumbling.
4. In a large bowl, beat the softened cream cheese until it’s completely smooth. Gradually add the sugar and continue beating until the mixture is light and creamy, taking care not to introduce too much air.
5. Add the eggs one at a time, beating well after each addition. This step helps maintain a silky texture. Then mix in the vanilla bean paste or scraped vanilla seeds until you see those delightful flecks distributed throughout.
6. Sift in the flour and gently stir until just combined. Overmixing here can lead to a dense texture, so stop as soon as the white flour streaks disappear. Next, fold in the sour cream and heavy cream with a spatula until the batter is luxuriously smooth.
7. Pour the batter over the prepared crust, using a spatula to smooth the top and eliminate any air pockets.
8. Bake in the preheated oven for 55–60 minutes. You’ll know it’s done when the edges are set and the center still has a slight, jiggly wobble.
9. Remove the cheesecake from the oven and run a thin knife around the edges to loosen any spots sticking to the pan. This helps prevent cracks as it cools. Allow it to cool completely at room temperature, about 1–2 hours.
10. Refrigerate the cheesecake for at least 4 hours, though preferably overnight. This chilling phase is crucial for developing that signature creamy texture and ensuring clean, perfect slices.
11. When you’re ready to serve, detach the sides of the springform pan and transfer the cheesecake to a serving platter. For extra flair, garnish with dollops of whipped cream or scatter fresh berries on top.
SERVING SUGGESTIONS FOR VANILLA BEAN BUTTER CHEESECAKE
Once your cheesecake has chilled to perfection, the only thing left is deciding how to present it. Whether you’re aiming for elegant simplicity or a burst of fruity color, these serving ideas will ensure your dessert steals the spotlight. Don’t be afraid to mix and match — each suggestion adds a unique flair to the rich vanilla base.
- A swirl of fresh whipped cream dotted with vanilla seeds adds both a cloud-like softness and an eye-catching topper. Pipe rosettes around the edge for a professional finish.
- Berry medley: Top with a vibrant mix of raspberries, blueberries, and sliced strawberries. The fruit’s slight tartness contrasts beautifully with the cake’s sweet, creamy richness.
- Fruit compote layer: Warm a handful of frozen cherries or berries with a spoonful of sugar and a squeeze of lemon juice, then spoon the velvety compote over each slice just before serving for a glossy, jammy accent.
- A drizzle of caramel or chocolate ganache transforms each bite into an over-the-top indulgence. Use a spoon to create thin ribbons across the top, or let it cascade elegantly down the sides.
HOW TO STORE VANILLA BEAN BUTTER CHEESECAKE
Storing your cheesecake properly is essential to preserve its smooth texture and keep those vanilla notes popping. Whether you’re preparing ahead for a party or saving leftovers for later enjoyment, these tips will maintain freshness and maximize flavor retention.
- Refrigeration: Always let the cheesecake cool completely before covering. Wrap the springform pan or the cut cake tightly with plastic wrap, then place it on the middle shelf of your refrigerator. It will stay fresh for up to 5 days.
- Freezing: For longer storage, slice the cheesecake into individual portions. Wrap each slice in a layer of plastic wrap followed by aluminum foil to prevent freezer burn. Store in a rigid, airtight container for up to 2 months. Thaw slices in the refrigerator overnight before serving.
- Airtight container: If you’ve already removed the pan sides, transfer the cake to a cake keeper or airtight box. This mini “climate control” helps retain moisture and prevent the absorption of other fridge odors.
- Serve-at-room-temperature: For best taste, remove refrigerated cheesecake about 15–20 minutes before serving. This brief rest allows the flavors and textures to soften, delivering that signature creamy melt-in-your-mouth feel.
CONCLUSION
This Vanilla Bean Butter Cheesecake captures everything we love about homemade desserts: a buttery, flavorful crust, a velvety, vanilla-scented filling, and a simplicity that still feels indulgent. We’ve walked through each essential ingredient, from the humble graham cracker crumbs to the show-stopping vanilla bean paste, and broken down every step of assembly and baking so you can achieve flawless results in your own kitchen. The preparation time of around 30 minutes, followed by an hour in the oven and several hours to chill, yields a dessert that’s worth every second of anticipation. With about 450 calories per slice, it remains a surprisingly approachable treat for special occasions or a cozy weekend at home.
Feel free to print this article or save it for later reference—your future self will thank you when you’re craving something rich and comforting. Don’t forget, you can scroll down to find a FAQ section with answers to common cheesecake conundrums. And if you try this recipe, I’d love to hear how it turned out! Leave a comment with your questions, any tweaks you’ve made, or feedback on your baking experience. Happy baking, and may every slice bring you pure, creamy bliss!
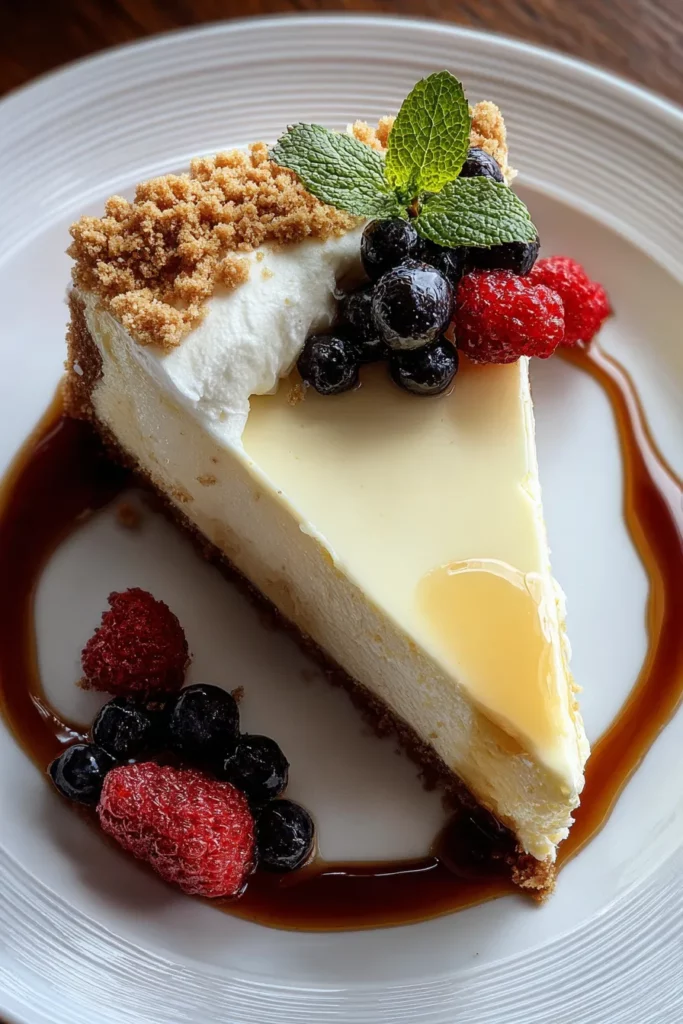

Vanilla Bean Butter Cheesecake
Description
This cheesecake features a rich, buttery crust and a velvety filling infused with real vanilla beans, promising every bite is a decadent delight worth savoring.
Ingredients
Instructions
-
Preheat your oven to 325°F (163°C). Grease a 9-inch springform pan.
-
In a mixing bowl, combine the graham cracker crumbs, 1/4 cup sugar, and melted butter. Mix until the crumbs are well-coated.
-
Press the crumb mixture firmly into the bottom of the prepared pan to form the crust. Use the back of a spoon or bottom of a glass to compact it evenly.
-
In a large bowl, beat the cream cheese until smooth. Gradually add the 1 cup of sugar, and continue beating until fully combined and creamy.
-
Add the eggs one at a time, beating well after each addition. Mix in the vanilla bean paste (or scraped vanilla seeds).
-
Sift in the flour, and mix until just combined. Then, gently fold in the sour cream and heavy cream until the batter is smooth and creamy.
-
Pour the batter over the prepared crust in the springform pan.
-
Bake in the preheated oven for about 55-60 minutes, or until the center is set, but still slightly jiggly when nudged.
-
Remove the cheesecake from the oven and run a knife around the edges to loosen any sticking parts. Allow it to cool completely at room temperature.
-
Refrigerate the cheesecake for at least 4 hours, but preferably overnight, to fully set and for flavors to meld.
-
Before serving, detach from the springform pan. For extra aesthetic, you can garnish with whipped cream or fresh berries.
Note
- Vanilla bean paste offers a more intense flavor; if substituting with vanilla extract, use 2 tsp.
- Ensure all ingredients, especially cream cheese, are at room temperature for the smoothest texture.
- Allow ample cooling and refrigeration time for the best structure before slicing.
- For a variation, try adding a layer of fruit compote on top before serving.