

There’s something utterly bewitching about sinking your teeth into a petite little brownie treat that carries whispers of Halloween magic in every layer. These spooky 3-layer Halloween brownie bites are like a miniature haunted house of flavors: a fudgy brownie base that’s dark and dense, followed by a creamy orange-tinted white chocolate ganache that evokes glowing jack-o’-lantern vibes, and topped off with a rich semi-sweet chocolate ganache crowned by a piece of candy corn and festive sprinkles. Whether you’re winding down after carving pumpkins or getting ready for a costume party, these bite-sized goodies transform an ordinary evening into a delightfully eerie celebration.
Beyond the playful decoration and vibrant colors, these brownie bites bring together textures and tastes that will have your taste buds dancing with glee. The Intermediate difficulty level makes this an exciting challenge for home bakers looking to step up their dessert game—think of it as an enchanting culinary experiment. In about 20 minutes of prep time, 18 minutes of baking, and 30 minutes of rest, you’ll have roughly 24 mini brownie morsels, each hovering around 120 calories. Perfectly handheld and irresistibly shareable, they’re a Dessert that steals the show at Halloween parties or cozy movie nights at home.
KEY INGREDIENTS IN SPOOKY 3-LAYER HALLOWEEN BROWNIE BITES
Before we conjure these bite-sized treats, let’s gather our spook-tacular lineup of ingredients. Each component plays a vital role in creating the perfect balance of fudgy texture, creamy layers, and festive flair—without any of the tricks, just pure baking delight.
- Brownie Mix
A reliable shortcut that ensures consistent fudgy brownies every time. This is the backbone of our base layer, providing deep chocolate flavor and a moist crumb that holds up to all the toppings.
- Eggs, Oil, and Water
These classic add-ins bring structure, moisture, and richness to the brownie batter. They activate the dry mix and ensure a tender interior that still feels dense and chewy.
- White Chocolate Chips
When melted into a silky ganache, these chips form the creamy orange layer. Their sweetness complements the dark brownie base and creates an eye-catching contrast when tinted.
- Semi-Sweet Chocolate Chips
The stars of our top ganache, these chips add balanced chocolate depth. They set with a glossy finish, anchoring the candy corn topper for a delightful bite.
- Heavy Cream
Combined with both types of chocolate, the cream turns them into luscious ganaches. It smooths out the melted chips and helps each layer set with just the right consistency.
- Orange Food Coloring
A few drops of gel or liquid coloring inject that iconic Halloween hue into the white chocolate layer, making it pop against the dark brownie.
- Candy Corn
These classic Halloween candies serve as charming toppers. Their vibrant tri-color design brings an extra dose of nostalgia and sweetness to every mini brownie.
- Black and Orange Sprinkles
A final festive flourish that adds a bit of crunch and color. They accentuate the holiday theme and help each bite look picture-perfect.
- Mini Muffin or Cupcake Liners
These keep each brownie bite neatly contained and make serving a breeze. They also protect the edges, preventing any sticking or crumbling during removal.
HOW TO MAKE SPOOKY 3-LAYER HALLOWEEN BROWNIE BITES
Let’s dive into the step-by-step magic of building these three-tiered brownie bites. From prepping the pan to layering your ganache, each detail contributes to that jaw-dropping final presentation.
1. Preheat your oven to the temperature specified on the brownie mix box and line a mini muffin tin with cupcake liners to prevent sticking.
2. Prepare the brownie mix according to the box instructions, incorporating eggs, oil, and water until the batter is smooth and uniform. Spoon the batter into each liner until three-quarters full, allowing room for rising.
3. Bake in the preheated oven for about 15–18 minutes, or until a toothpick inserted into the center comes out clean. This ensures the brownies remain moist without being undercooked.
4. Allow the brownie bites to cool completely in the pan before removing them. This step helps them firm up and maintain their shape.
5. In a microwave-safe bowl, combine the white chocolate chips and half of the heavy cream. Microwave in 20-second intervals, stirring between each, until the mixture is melted and smooth. Add a few drops of orange food coloring and stir until the hue is even.
6. In another microwave-safe bowl, combine the semi-sweet chocolate chips with the remaining cream. Microwave in 20-second bursts, stirring until the ganache is silky and free of lumps.
7. Spoon a small dollop of the orange-tinted white chocolate ganache onto each brownie bite, spreading it gently to cover the top. Let it set slightly until tacky.
8. Spoon a smaller dollop of semi-sweet chocolate ganache on top of the orange layer, using the back of the spoon to smooth it into an even cap.
9. Press a piece of candy corn into the still-soft semi-sweet layer, anchoring it firmly into place.
10. Decorate with a sprinkle of black and orange sprinkles while the chocolate is still setting to ensure they adhere.
11. Allow all layers to set completely—about 15–20 minutes at room temperature or a quicker chill in the refrigerator—before serving.
SERVING SUGGESTIONS FOR SPOOKY 3-LAYER HALLOWEEN BROWNIE BITES
Once your miniature masterpieces have fully set, it’s time to think about the showstopping moment: serving these brownies to delighted guests. Presentation can elevate even the simplest treat into something spectacular, and with Halloween right around the corner, you’ll want every detail to scream “spooky fun.” Whether you’re hosting a ghoulish gathering or surprising trick-or-treaters with a homemade delight, these brownie bites fit the bill. From festive platters to warm beverage pairings, there are endless ways to make these treats stand out on your dessert table.
- Chilled Dessert Platter: Arrange the brownie bites on a tiered cake stand and surround them with fake cobwebs and tiny plastic spiders. The chilly presentation heightens the glossy look of the ganache.
- Hot Cocoa Companion: Serve each brownie alongside a steaming mug of cinnamon-spiced hot cocoa. The warmth of the drink contrasts nicely with the cool, creamy layers.
- Party Favor Bags: Fill small cellophane bags with three to four brownie bites, tie them with black and orange ribbon, and hand them out as spooky party favors.
- Gothic Dessert Board: Combine your brownie bites with dark chocolate truffles, caramel popcorn, and dried fruits on a rustic wood board for an atmospheric spread that’s equal parts eerie and enticing.
HOW TO STORE SPOOKY 3-LAYER HALLOWEEN BROWNIE BITES
After the thrill of baking and the joy of indulging in a few, you might wonder how to keep these spooky delights fresh and flavorful for as long as possible. Proper storage not only preserves texture and taste but also maintains that striking layered appearance. Whether you’re preparing in advance for a big event or simply want to savor leftovers over a few days, following the right storage methods is key. Below are practical tips for keeping your brownie bites in tip-top shape until the next bewitching moment.
- Refrigerator Storage: Place brownie bites in an airtight container with layers separated by parchment paper to prevent sticking. Store for up to one week at 4 °C (39 °F) to keep the ganache firm and flavors vibrant.
- Freezer Option: For extended storage, lay the brownie bites in a single layer on a baking sheet, freeze until solid, then transfer to freezer-safe bags. They can last up to three months; thaw in the fridge before serving.
- Room Temperature (Short Term): If you plan to enjoy them within 24 hours, keep the bites in a covered cake stand or container in a cool, dry place away from direct sunlight.
- Humidity Control: Include a small silica gel packet or a folded paper towel in the storage container to absorb excess moisture, especially if you live in a humid climate.
CONCLUSION
Crafting these spooky 3-layer Halloween brownie bites is like weaving a Halloween tale in miniature form—each layer telling part of the story. Starting with a simple brownie mix and transforming it into a three-tiered spectacle shows just how creative and fun home baking can be. From the moment you preheat the oven to that final sprinkle of orange and black decoration, you’re not merely making a dessert but sculpting an experience that’s rich in texture, flavor, and festive flair. The Intermediate difficulty keeps things exciting without overwhelming, and the total prep-plus-cook time fits neatly into an afternoon of Halloween prep. You can easily jot down this recipe, print the article, and save it for your next spooky get-together. Don’t forget to scroll down to the FAQ below for quick answers on troubleshooting and ingredient swaps!
After all the chattering about ingredients and methodical layering, the real magic happens when you share these brownie bites with friends and family. Their wide eyes at the vibrant orange ganache, the satisfying crack of the chocolate topping, and the nostalgia of candy corn atop each bite will spark smiles and lively conversation. If you decide to try this recipe, let me know how it went! Did you experiment with candy eyeballs instead of candy corn? Have questions about chocolate tempering or storage tricks? Drop a comment below with your stories, feedback, or any burning questions. I’m here to help you master every whisk, drizzle, and spooky sprinkle. Happy baking, and may your Halloween be deliciously haunting!
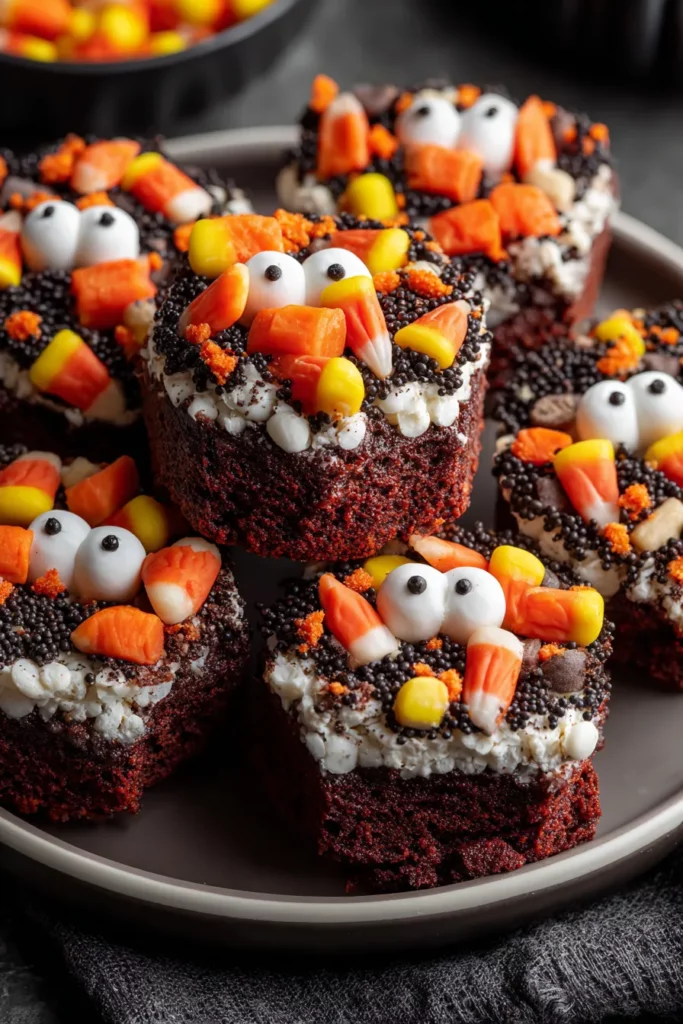

Spooky 3-Layer Halloween Brownie Bites
Description
Experience the festive spirit of Halloween with these spooky 3-layer brownie bites. Rich chocolate, creamy orange ganache, and candy corn make every bite enchanting!
Ingredients
Instructions
-
Preheat your oven to the temperature specified on the brownie mix box. Line a mini muffin tin with cupcake liners.
-
Prepare the brownie mix according to the box instructions. Spoon the batter into each mini muffin cup until three-quarters full.
-
Bake in the preheated oven according to the box instructions for mini muffins, usually about 15-18 minutes. Insert a toothpick to check for doneness. If it comes out clean, the brownies are ready.
-
Allow the brownie bites to cool completely in the pan before removing them.
-
In a microwave-safe bowl, combine the white chocolate chips and half of the heavy cream. Microwave in 20-second intervals, stirring in between, until the chocolate is completely melted and smooth. Add a few drops of orange food coloring and stir until uniform in color.
-
In another microwave-safe bowl, combine the semi-sweet chocolate chips and the remaining heavy cream. Microwave in 20-second intervals, stirring in between, until smooth.
-
Spoon a small dollop of orange-tinted white chocolate onto each brownie bite, spreading it to cover the top. Allow it to set slightly.
-
Spoon a smaller dollop of the semi-sweet chocolate ganache on top of the orange layer, using the back of the spoon to spread it gently.
-
Press a piece of candy corn into the semi-sweet chocolate layer on each brownie bite.
-
Decorate with a sprinkle of black and orange sprinkles while the chocolate is still setting.
-
Allow all layers to set completely before serving.
Note
- For best results, use gel food coloring to achieve vibrant colors without compromising the consistency of the chocolate.
- To speed up the setting process, place the brownie bites in the refrigerator for a few minutes.
- Candy eyeballs can be used instead of candy corn to create a spooky effect.
- These brownie bites are perfect for a Halloween party and make for a festive hand-held treat.