

If you’re craving sushi but want a playful twist that’s perfect for lunch or entertaining, these Asian-inspired sushi cups have got you covered. Fluffy rice forms little edible bowls that cradle creamy avocado, crisp cucumber, and juicy shrimp, all crowned with a spicy wasabi cream drizzle and a shower of toasted sesame seeds. They’re fun to make, customizable to your taste, and sure to spark conversation at any gathering—so let’s dive in and roll out this hands-on sushi adventure!
Key Ingredients
Before you get rolling, let’s gather the essentials for these mini sushi bowls that pack a flavor punch.
- 1 cup sushi rice: Fluffy, sticky base that holds the cup shape.
- 1 1/4 cups water: Perfect hydration for tender rice grains.
- 3 tablespoons rice vinegar: Adds tangy sweetness and balances flavors.
- 1 tablespoon sugar: Sweetens sushi rice and enhances the vinegar’s zing.
- 1 teaspoon salt: Seasoning that rounds out the sushi rice taste.
- 1 ripe avocado, diced: Creamy texture and rich flavor contrast.
- 1/2 cucumber, finely chopped: Crisp freshness for crunchy bite.
- 1/2 cup cooked shrimp, chopped: Succulent protein that pairs beautifully.
- 1/4 cup edamame beans, shelled: Vibrant color and nutty pop.
- 1/4 cup nori sheets, cut into small strips: Briny umami ribbons.
- 1/4 cup sesame seeds, toasted: Crunchy, nutty garnish.
- 2 tablespoons soy sauce (for dipping): Salty finish on each savory mouthful.
- 1/2 cup sour cream or Greek yogurt: Creamy base for the wasabi sauce.
- 1–2 teaspoons wasabi paste: Spicy kick adjustable to taste.
- 1 teaspoon lemon juice: Bright acidity in the wasabi cream.
- Salt to taste: Fine-tunes the wasabi cream seasoning.
How To Make Delectable Asian-Inspired Sushi Cups with Avocado and Wasabi Cream
Get ready for a hands-on cooking journey where sushi rice transforms into cute little bowls, and a zesty wasabi cream elevates every bite. Follow these steps carefully to achieve the ideal sticky rice base, creamy sauce, and perfectly layered fillings that pop with texture and flavor.
1. Rinse the sushi rice under cold water until the water runs clear. This removes excess starch for perfectly tender grains.
2. In a medium saucepan, combine the rinsed rice and water. Bring to a boil, then reduce the heat to low, cover, and simmer for about 20 minutes or until fully absorbed.
3. Remove the saucepan from heat and let the rice sit, covered, for another 10 minutes to finish steaming.
4. Meanwhile, whisk together the rice vinegar, sugar, and salt in a small bowl until the sugar dissolves, creating the sushi vinegar mixture.
5. Transfer the hot rice to a large bowl, then gently fold in the sushi vinegar mixture using a wooden spoon or rice paddle. Spread the rice out to cool to room temperature.
6. In a separate bowl, whisk the sour cream (or Greek yogurt), wasabi paste, lemon juice, and salt until smooth. Adjust the wasabi level to your spice preference.
7. Line a muffin tin with silicone molds or paper liners. Press a small amount of cooled sushi rice into the bottom and sides of each cavity, forming a mini rice bowl.
8. Layer in the chopped shrimp, diced avocado, finely chopped cucumber, and shelled edamame, filling each rice cup to the brim.
9. Finish with a generous drizzle of wasabi cream, a sprinkle of toasted sesame seeds, and a few nori strips. Serve with soy sauce on the side for dipping.
Serving Suggestions
These sushi cups look gorgeous on any table and can be served in a variety of creative ways. Whether you’re hosting a casual brunch or a formal affair, presentation matters as much as flavor. Here are some fun ideas to elevate your sushi cup spread:
- Serve on a large wooden board lined with banana leaves for a rustic, tropical vibe and easy sharing.
- Arrange on individual appetizer plates, adding a small dollop of extra wasabi cream and a few pickled ginger slices for color and zing.
- Pair with miso soup shooters in shot glasses—warm broth and cool sushi cups create a delightful temperature contrast.
- Garnish with microgreens or thinly sliced radishes to add elegance, freshness, and a pop of color.
Tips For Perfect Delectable Asian-Inspired Sushi Cups with Avocado and Wasabi Cream
Turning sushi rice into whimsical cups is easier than you think, but a few insider pointers will take your game to pro level. Make sure each layer is well-balanced and fresh, and don’t be afraid to inject your personality into the fillings. Prep components in advance if you’re short on time, and keep your workspace organized. With these friendly tips, you’ll breeze through assembly and wow your guests at the first bite.
- These sushi cups are a fun and interactive way to enjoy sushi at gatherings.
- Feel free to customize the fillings based on your preferences; tofu, crab, or vegetables work great too.
- For a spicy kick, add some sriracha or spicy mayo alongside the wasabi cream.
- These cups are best served fresh, but you can prepare the components ahead of time and assemble just before serving.
How To Store It
Planning ahead is key when you want last-minute assembly without sacrificing freshness. While these sushi cups are best enjoyed immediately, storing each component properly ensures you can pull everything together in minutes and still deliver top-notch flavor and texture.
- Refrigerate the seasoned sushi rice in an airtight container for up to 4 hours; bring to room temperature before pressing into cups.
- Store diced avocado, cucumber, and cooked shrimp in separate airtight containers in the fridge for up to 2 hours to prevent sogginess.
- Keep the wasabi cream in a sealed jar in the refrigerator for up to 2 days; give it a quick stir before using.
- Assemble cups just before serving to maintain the creamiest textures and avoid moisture buildup.
Frequently Asked Questions
Got questions? Let’s clear up any sushi cup mysteries so you can roll with confidence.
- Can I use a different type of rice if I don’t have sushi rice?
You can substitute short-grain rice for sushi rice since it also becomes sticky when cooked, though the texture may be slightly less chewy. If using medium-grain rice, rinse thoroughly and use the same 1:1.25 rice-to-water ratio, but expect a looser grain structure. Avoid long-grain varieties, as they won’t hold the cup shape as well.
- How do I prevent the rice cups from sticking to the muffin tin or liners?
Silicone molds work best because they release easily without grease. If using a metal muffin tin, lightly spray each cavity with neutral oil or use high-quality nonstick cupcake liners. Press the rice firmly against the sides and bottom—this compacts the grains and makes removal smoother once the cups are set.
- Can I prepare any components ahead of time?
Yes. Cook and season the sushi rice up to 4 hours in advance, then cool to room temperature and store covered in the refrigerator. Chop avocado, cucumber, and protein, and prepare the wasabi cream up to 2 hours ahead; keep them refrigerated in airtight containers. Assemble the cups just before serving to maintain the freshest texture and flavor.
- How can I customize or adjust the heat level of the wasabi cream?
Mix in 1 teaspoon of wasabi paste first and taste; add up to 2 teaspoons for more heat. If it becomes too spicy, thin it out with a bit more sour cream or Greek yogurt, and balance with an extra pinch of salt or a dash of lemon juice. For a milder version, start with ½ teaspoon of wasabi.
- What are some protein or vegetable substitutions if I don’t want shrimp?
You can swap shrimp for cooked crab meat, flaked smoked salmon, diced tofu, or shredded chicken. For a vegetarian option, boost the edamame and add thinly sliced bell peppers, carrots, or marinated mushrooms. Any tender, bite-sized ingredients that complement the rice and wasabi cream will work nicely.
- How should I store leftovers, and can I freeze assembled cups?
These sushi cups are best enjoyed fresh. If you have leftovers, store components separately in airtight containers: rice (up to 24 hours at room temperature, then refrigerate), fillings, and wasabi cream (up to 2 days in the fridge). Do not freeze, as thawing destroys the rice texture and avocado turns mushy.
- What’s the easiest way to toast sesame seeds at home?
Heat a small, dry skillet over medium-low heat. Add the sesame seeds in a single layer and stir or shake the pan constantly for 2–3 minutes until they turn golden and release a nutty aroma. Immediately transfer them to a cool plate so they stop cooking and retain their crispness.
What Makes This Special
These sushi cups hit the sweet spot between playful presentation and mouthwatering flavor, mixing creamy avocado with crisp veggies and a touch of heat from wasabi cream. They’re perfect for gatherings, lunch breaks, or whenever you need a unique bite that’s both impressive and easy. Feel free to print this guide and tuck it into your recipe binder, then come back later for round two. I’d love to hear how they turned out—drop a comment if you have questions, share your tweaks, or just brag about your sushi cup masterpieces!
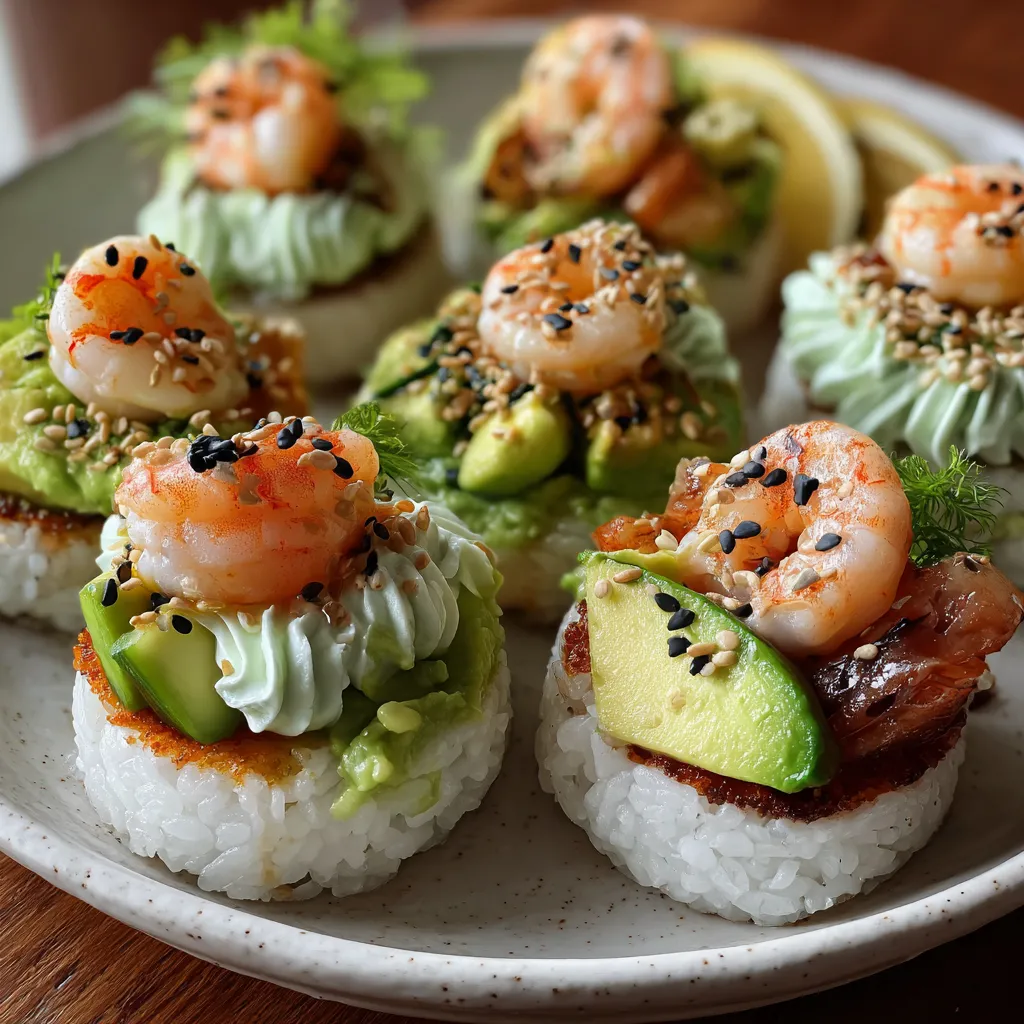

Delectable Asian-Inspired Sushi Cups with Avocado and Wasabi Cream
Description
Fluffy sushi rice pressed into mini cups cradles creamy avocado, crunchy cucumber, and tender shrimp, topped with zesty wasabi cream and a shower of toasted sesame seeds for an exciting flavor pop.
Ingredients
Instructions
-
Start by rinsing the sushi rice under cold water until the water runs clear. This removes excess starch and helps achieve the perfect texture.
-
In a medium saucepan, combine the rinsed rice and water. Bring to a boil, then reduce the heat to low, cover, and simmer for about 20 minutes or until the water is completely absorbed.
-
Remove the saucepan from heat and let the rice sit, covered, for another 10 minutes to allow it to steam.
-
While the rice is resting, prepare the sushi vinegar mixture by combining rice vinegar, sugar, and salt in a small bowl. Stir until the sugar dissolves.
-
Transfer the cooked rice to a large bowl, and gently fold in the sushi vinegar mixture using a wooden spoon or rice paddle. Allow the rice to cool to room temperature.
-
In a small bowl, whisk together the sour cream (or Greek yogurt), wasabi paste, lemon juice, and salt until smooth and creamy. Adjust the wasabi level according to your taste preference.
-
To assemble the sushi cups, line a muffin tin with small cupcake liners or use silicone molds. Press a small amount of cooled sushi rice into the bottom and up the sides of each cup, creating a little bowl.
-
Fill each sushi cup with a layer of chopped shrimp (or your protein), diced avocado, finely chopped cucumber, and shelled edamame beans.
-
Top each cup with a drizzle of wasabi cream, a sprinkle of toasted sesame seeds, and a few strips of nori.
-
Serve the sushi cups with soy sauce on the side for dipping, and enjoy with friends or family!
Note
- These sushi cups are a fun and interactive way to enjoy sushi at gatherings.
- Feel free to customize the fillings based on your preferences; tofu, crab, or vegetables work great too.
- For a spicy kick, add some sriracha or spicy mayo alongside the wasabi cream.
- These cups are best served fresh, but you can prepare the components ahead of time and assemble just before serving.