

Crunchy Tangy Refrigerator Pickled Vegetables are a bright and easy way to add zing to any meal. These crisp fridge pickles burst with tangy zing and vibrant color to liven up sandwiches, salads, or snacks. A beginner-friendly mix of cucumbers, carrots, daikon, cauliflower, and green beans steeps in a warm, spiced brine before chilling to crunchy perfection. One bite pops with vinegar tang, garlic heat, and fragrant dill—your new favorite homemade pickle awaits!
Key Ingredients
Before you get started, gather these fresh veggies and pantry staples that deliver crunch, color, and flavor:
- 2 cups cucumbers sliced: Crisp cucumber rounds that soak up the tangy brine and add satisfying crunch.
- 1 cup carrots julienned: Bright orange slivers bringing natural sweetness and a firm bite.
- 1 cup daikon radish sliced: Mildly peppery rounds that add texture and soak up spices.
- 1 cup cauliflower florets: Tender florets that hold their shape and absorb the brine.
- 1 cup green beans trimmed: Snappy green beans for color contrast and extra crispness.
- 1 cup water: Dilutes the vinegar for balanced acidity.
- 1 cup white vinegar: Primary acid source for that classic pickle tang.
- 1/2 cup apple cider vinegar: Adds fruity depth and mellow acidity.
- 1/4 cup granulated sugar: Balances the sour flavors with gentle sweetness.
- 1 tablespoon kosher salt: Essential seasoning that enhances flavor and aids preservation.
- 1 teaspoon mustard seeds: Warm, nutty bursts of spice throughout the jar.
- 1 teaspoon coriander seeds: Citrusy notes that elevate the brine’s complexity.
- 1/2 teaspoon black peppercorns: Bold peppery pops in every bite.
- 2 cloves garlic sliced: Aromatic heat and savory layers.
- 1 bay leaf: Herbal undertone that deepens the brine’s flavor.
- 1 sprig fresh dill: Fragrant, classic pickle herb for bright, grassy notes.
- 1/4 teaspoon red pepper flakes: Touch of heat to balance the zing.
How To Make Crunchy Tangy Refrigerator Pickled Vegetables
Preparing these pickles is simple and hands-off once you’ve got your brine and jar ready. You’ll warm a sweet-savory vinegar mixture, pack in the veggies and spices, pour in hot brine, then let the fridge work its magic. In just a day, you’ll have vibrant, crunchy pickles on demand.
1. In a small saucepan, combine the water, white vinegar, apple cider vinegar, granulated sugar, and kosher salt, stirring gently to bring all ingredients together.
2. Heat the mixture over medium heat, stirring occasionally until the sugar and salt fully dissolve and the brine begins to steam; then remove from heat.
3. Pack the sliced cucumbers, julienned carrots, sliced daikon, cauliflower florets, and trimmed green beans tightly into a clean quart-size jar to maximize space and flavor infusion.
4. Layer the mustard seeds, coriander seeds, black peppercorns, sliced garlic, bay leaf, fresh dill sprig, and red pepper flakes among the vegetables for even spice distribution.
5. Carefully pour the hot brine into the jar, ensuring all vegetables are fully submerged, then seal with a tight-fitting lid to trap the flavors.
6. Allow the jar to cool to room temperature before moving it to the refrigerator—this step prevents jar breakage and preserves crispness.
7. Refrigerate the pickles and let them sit for at least 24 hours for the flavors to meld and the veggies to achieve optimal tang and snap.
8. Keep the jar refrigerated, and enjoy these crunchy pickles within four weeks for the best texture and taste.
Serving Suggestions
Once your pickles are ready, they make mealtime more fun and flavorful. From casual snacks to elegant entertaining, here’s how to showcase their tangy crunch:
- Snack Plate: Arrange a colorful selection of pickled veggies on a platter alongside cheese, olives, and crackers for an easy party appetizer.
- Sandwich Booster: Layer the drained pickles onto your favorite sandwich or burger to add crisp tang and a flavor punch.
- Salad Topper: Chop the pickles and scatter over green salads or grain bowls to introduce bright acidity and extra crunch.
- Taco Garnish: Use pickled veggies as a zesty taco topping, pairing beautifully with grilled meats or fish.
Tips For Perfect Crunchy Tangy Refrigerator Pickled Vegetables
Ready to level up your pickling game? A few friendly notes can make all the difference:
- Choose firm, fresh vegetables for maximum crunch
- Feel free to swap spices freely, adding dill seeds or different peppercorn varieties to suit your taste
- Rest for flavor: let pickles sit 1–2 days for deeper taste, though they’re still delicious after a few hours
- Consume within one month to keep that ideal texture and tang
How To Store It
Proper storage ensures your pickles stay bright, crunchy, and safe to eat. Follow these simple methods:
- Refrigerate in the jar: After cooling, keep the sealed jar in the coldest part of your fridge to maintain crispness and flavor.
- Use an airtight container: If transferring, choose a clean, air-tight container and pour in the brine to preserve tang.
- Keep utensils clean: Always use sterile spoons or tongs when removing pickles to prevent contamination.
- Monitor shelf life: Label your jar with the date; enjoy within four weeks for best quality.
Frequently Asked Questions
Here are some quick answers to common pickling questions:
- How long does it take to prepare these refrigerator pickled vegetables?
It takes about 15–20 minutes to prepare this recipe. This includes slicing the cucumbers and daikon, julienning the carrots, trimming the green beans, chopping the cauliflower into florets, measuring out the vinegars, sugar, and salt, and heating the brine until the sugar and salt dissolve.
- How long should I wait before tasting the pickles?
For optimal tang and crunch, allow the pickles to sit in the refrigerator for at least 24 hours. The vegetables are still tasty after a few hours, but the flavors deepen and meld after 1–2 days. You can sample them sooner if you prefer a lighter pickle, but plan on 24 hours for the classic tangy bite.
- Can I use different vegetables or spices in this recipe?
Yes, you can swap or add vegetables such as bell peppers, radishes, or asparagus as long as they’re fresh and firm for maximum crunch. You can also experiment with spices—try adding dill seeds, fennel seeds, or different peppercorn varieties. Just keep the overall vegetable-to-brine ratio and the basic acid-to-water balance the same to ensure proper pickling.
- What’s the best way to keep the vegetables crisp?
To maintain crunch, choose the freshest, firmest vegetables you can find. Ensure your brine is fully heated so the sugar and salt dissolve completely, then pour it in while hot to help seal in texture. You can also pre-chill your jar to minimize temperature shock, and always store the pickles in the refrigerator rather than at room temperature.
- How should I store these pickles, and how long will they keep?
After the jar has cooled to room temperature, seal it tightly and store it in the refrigerator. The pickles stay at peak quality for up to four weeks; consumption within one month ensures the best texture and flavor. Always use clean utensils to prevent contamination and reseal the jar promptly after serving.
- Do I need to sterilize the jar before pickling?
While full canning procedures aren’t required for refrigerator pickles, it’s important to use a clean, food-safe jar. Wash it in hot, soapy water or in the dishwasher on a sanitize cycle, and rinse thoroughly. You can also pour boiling water into the jar and let it sit for a few minutes before discarding the water and adding the vegetables to ensure a hygienic environment.
- Can I adjust the tanginess or sweetness of the brine?
Absolutely. To increase tanginess, slightly raise the proportion of white vinegar or apple cider vinegar, but keep the total liquid volume the same so the vegetables stay submerged. To mellow the acidity or add sweetness, increase the granulated sugar by up to 2 tablespoons, tasting as you go. Just remember to maintain enough kosher salt—about 1 tablespoon per quart—to support both flavor and preservation.
What Makes This Special
There’s something delightfully playful about a jar of pickles that crackles when you bite in—Crunchy Tangy Refrigerator Pickled Vegetables hit that mark with style. The blend of crisp vegetables, warm spices, and dual vinegars delivers a flavor carnival in every mouthful. From the first tang to the final crunch, this beginner-friendly recipe proves that homemade pickles can be quick, colorful, and utterly addictive. Feel free to print this page and save it for later, and don’t hesitate to share your feedback or questions if you give it a try!
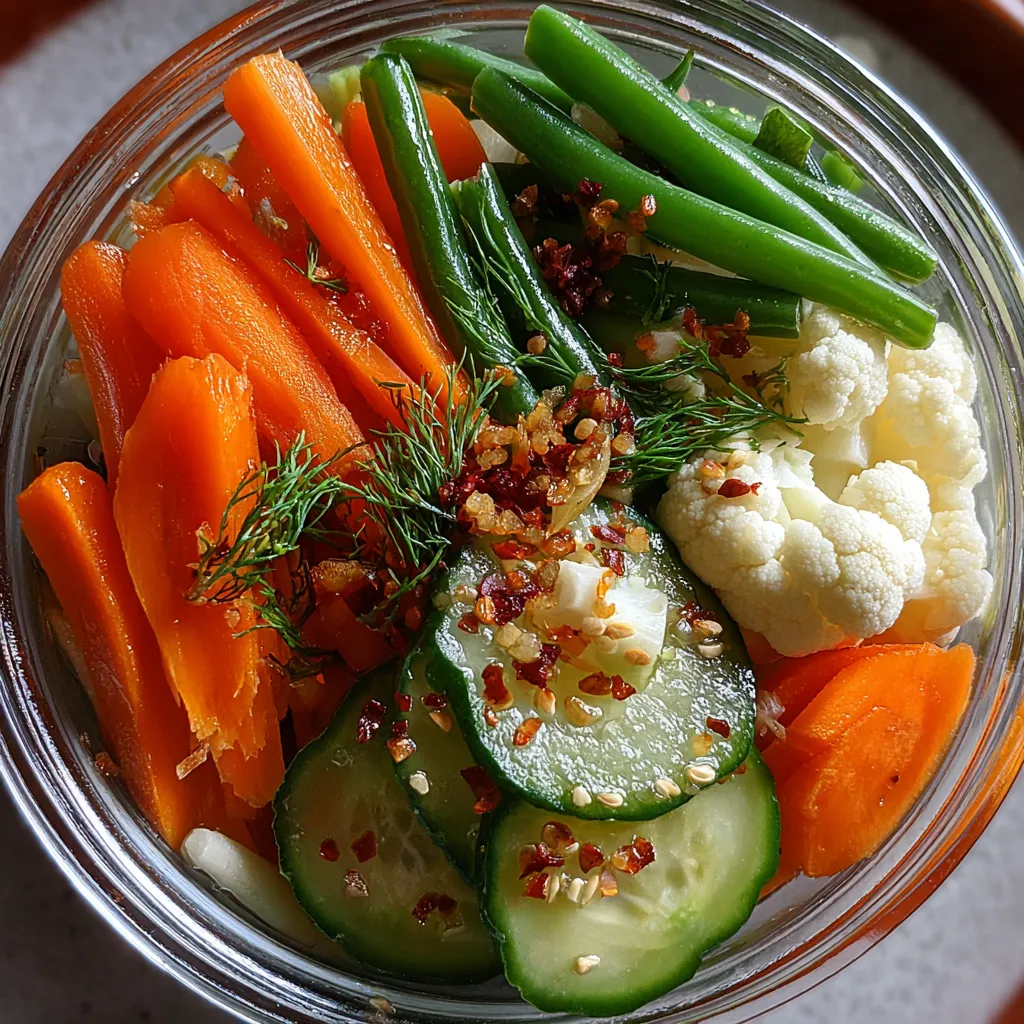

Crunchy Tangy Refrigerator Pickled Vegetables
Description
A medley of cucumbers, carrots, daikon, cauliflower, and green beans sit in a warm, spiced brine before chilling to bright, crunchy perfection. Each bite pops with vinegar tang, garlic heat, and fragrant dill.
Ingredients
Instructions
-
In a small saucepan combine water, white vinegar, apple cider vinegar, sugar, and salt.
-
Heat the mixture over medium heat, stirring until the sugar and salt dissolve, then remove from heat.
-
Tightly pack cucumbers, carrots, daikon, cauliflower, and green beans into a clean quart-size jar.
-
Add mustard seeds, coriander seeds, peppercorns, garlic, bay leaf, dill, and red pepper flakes among the vegetables.
-
Carefully pour the hot brine into the jar, fully submerging the vegetables, and seal with a lid.
-
Let the jar cool to room temperature before placing it in the refrigerator.
-
Allow the vegetables to pickle for at least 24 hours before eating for optimal tang and crunch.
-
Keep refrigerated and enjoy within four weeks.
Note
- Choose firm, fresh vegetables for maximum crunch
- Feel free to swap or add spices like dill seeds or peppercorn varieties
- Flavor improves after resting 1–2 days but is still tasty after a few hours
- Store in the refrigerator and consume within one month for best quality